The air is crisp, the leaves are falling, and Halloween is just around the corner. It’s that time of the year when you can get creative and transform your home into a spooky and enchanting place. Mini pumpkin painting is an easy and fun way to add a touch of Halloween charm to your interior decor. In this article, we will guide you through 13 mini pumpkin painting ideas that will elevate your Halloween decorations. But before we dive into the world of creative pumpkin designs, let’s ensure you have the essential tools you need.
The Essentials: Mini Pumpkin Painting Kit
Before you embark on your pumpkin painting journey, it’s important to gather the essential basic tools. A well-stocked pumpkin painting kit is your best friend in creating stunning mini pumpkin designs. Here’s what you’ll need:
1. Mini Pumpkins
Start with selecting the perfect mini pumpkins. These can be found in various sizes and shapes, allowing you to choose the ones that best fit your desired pumpkin painting designs. Whether you prefer small and round pumpkins or quirky, uneven shapes, there’s no shortage of options.
2. Acrylic Paints
Acrylic paints are the ideal choice for pumpkin decorating. They come in a wide range of vibrant colors and offer great coverage, ensuring that your designs will pop. Make sure to have a variety of Halloween-themed colors like orange, black, white, green, and purple. These colors serve as your foundation for creating spooky or enchanting pumpkin designs.
3. Paintbrushes
A key to successful mini pumpkin painting is having a selection of paintbrushes. Different brush sizes will allow you to add intricate details or cover larger areas, depending on the design. Fine-tipped brushes are perfect for delicate work, while broader brushes make filling in larger areas a breeze.
4. Palette
A palette is essential for mixing and blending colors to achieve the perfect shade for your pumpkin painting designs. It’s a simple tool that can significantly enhance your creativity.
5. Painting Supplies
Don’t forget the basics, like a container of water for rinsing your brushes, paper towels for cleanup, and a smock to protect your clothing. Pumpkin painting can get a bit messy, but with the right supplies, it’s a hassle-free process.
6. Creativity and Patience
While not physical tools, these are perhaps the most important essentials. Nowyou are ready for the the 13 mini pumpkin painting ideas that create a wonderful opportunity to unleash your creativity. Experiment with colors, shapes, and designs, and don’t be afraid to make mistakes. Patience is key, especially when working on intricate details, so take your time and enjoy the process.
Lets begin! These mini pumpkin painting ideas will blow your mind
Now that you have your pumpkin painting kit ready, let’s explore 13 mini pumpkin painting ideas in more detail, providing valuable insights and tips for each design:
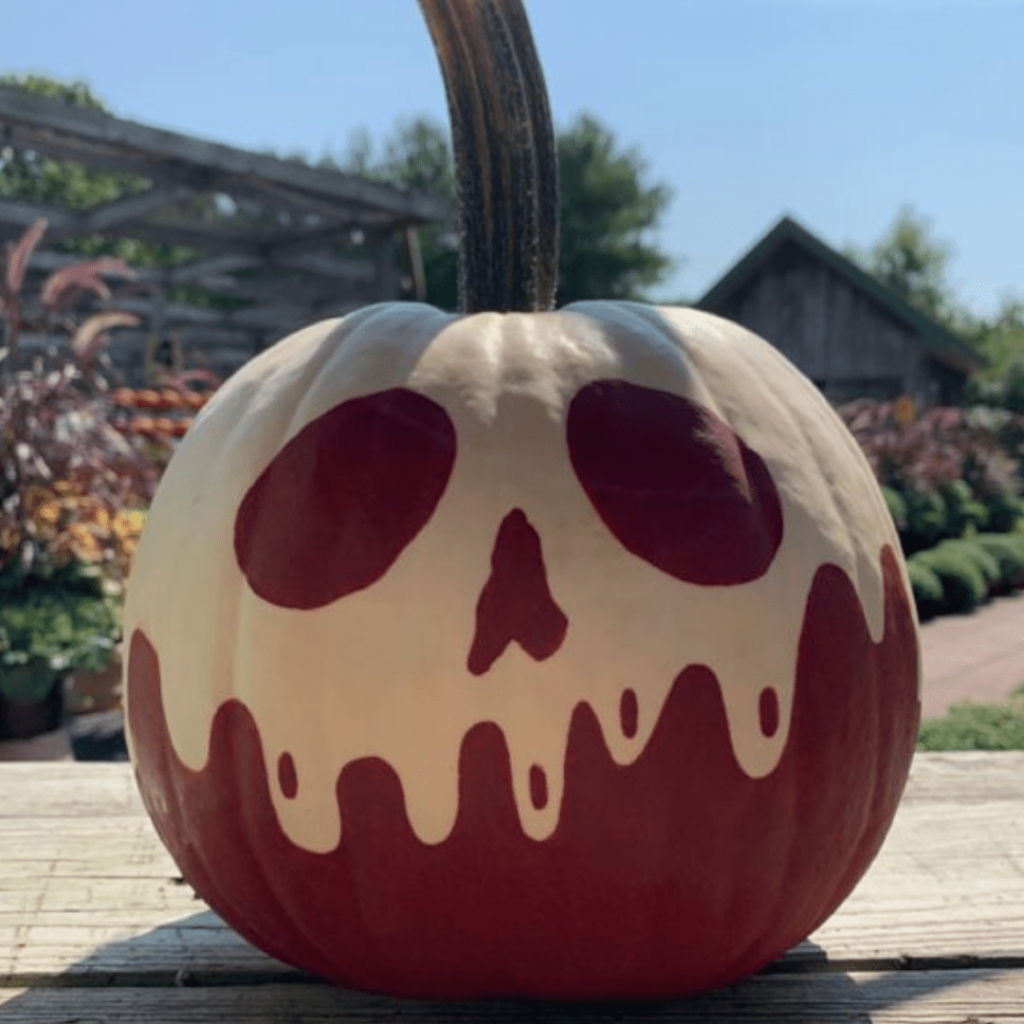
1. Skull Pumpkin Painting
Skull pumpkin painting is a classic choice that allows for endless creativity. Consider adding ornate details like floral patterns, intricate cracks, or even a vibrant Day of the Dead theme for a unique twist. Remember, no two skulls are alike, and you have the creative freedom to make yours truly special.
Materials: Mini pumpkin, black and white acrylic paints, fine-tipped paintbrush
Instructions:
- Start with a clean, dry mini pumpkin. Make sure it’s free from any dirt or residue.
- Paint the entire pumpkin white as a base coat. This will provide a clean canvas for your skull design.
- Once the white base coat is dry, use your fine-tipped paintbrush and black paint to outline the eye sockets. Create two almond-shaped hollows, slightly angled towards the center.
- Add a triangular nose shape below the eye sockets, and then draw a sinister grin beneath the nose. The mouth can be either a simple curve or an intricate, toothy smile—let your creativity shine.
- Optional: You can add cracks or other patterns to make the skull more detailed and unique.
2. Spider Pumpkin Painting
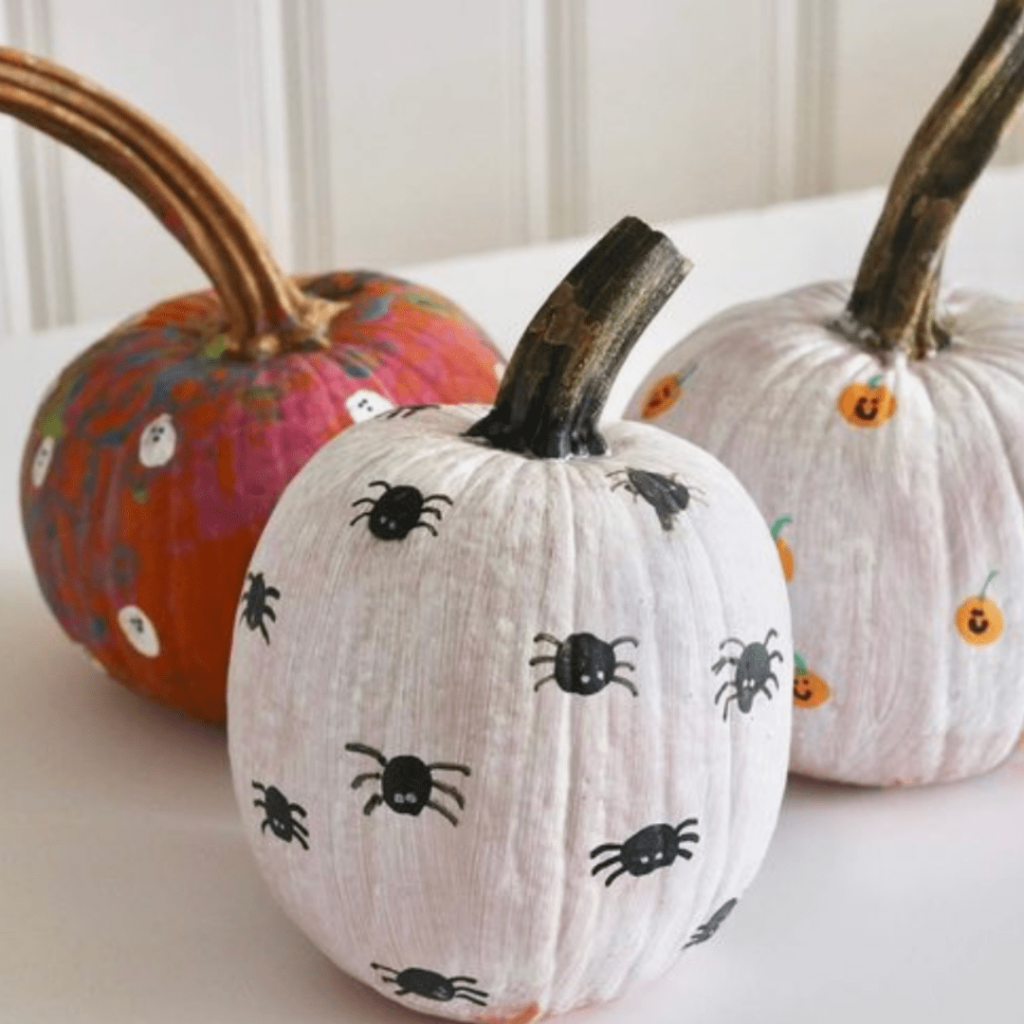
Creating spider-themed pumpkins can be a great family activity. Get the kids involved in designing cute or spooky spiders. Experiment with different spider sizes, leg variations, and web patterns. Painting small, colorful insects on the pumpkin’s background can add a playful contrast.
Materials: Mini pumpkin, black and white acrylic paints, fine-tipped paintbrush
Instructions:
- Begin with a clean mini pumpkin as your canvas.
- Paint the pumpkin entirely black to create a dark background.
- Once the black paint has dried, use your fine-tipped paintbrush and white paint to draw a spider on the pumpkin. Begin by creating a small circular body.
- Add eight legs extending from the body. These can be short or long, depending on your spider’s design. Consider giving the legs a few jointed segments for a more realistic look.
- To make your spider’s appearance more dynamic, consider adding white dots on its back for the appearance of reflective eyes.
- Create a spider web by drawing a series of interconnected white lines radiating from a central point near the spider. This will give the impression of a spider web.
3. Bats Pumpkin Painting
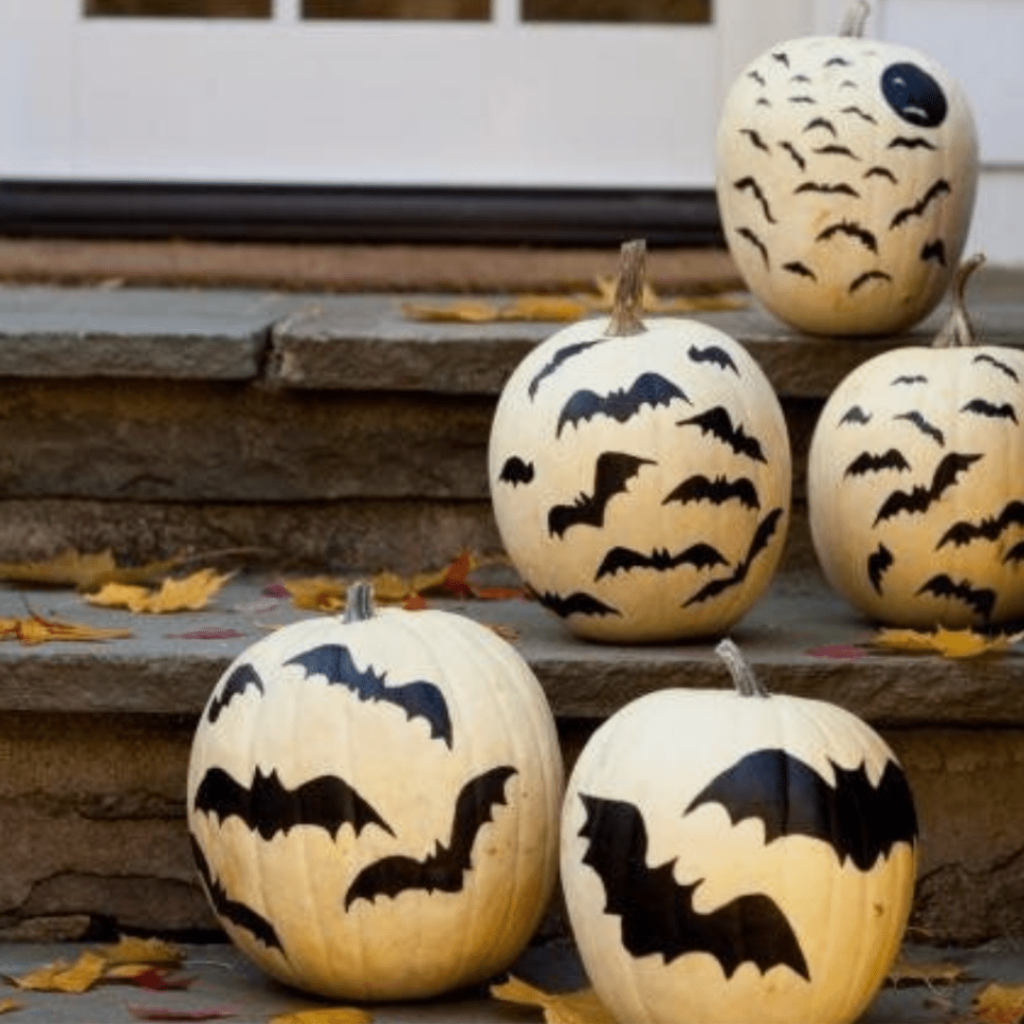
Bats are mysterious creatures of the night, and you can use this theme to create an eerie atmosphere. Consider experimenting with different shades of black and gray for a subtle, layered effect. For a whimsical touch, try adding bats in playful poses, such as hanging upside down.
Materials: Mini pumpkin, black and white acrylic paints, fine-tipped paintbrush
Instructions:
- Start with a clean, dry mini pumpkin.
- Paint the entire pumpkin black as a base coat.
- Once the black paint is dry, use white paint and your fine-tipped brush to create bats. Bats can vary in size and position; they can hang upside down or fly. Experiment with different poses.
- For flying bats, you can depict them with outstretched wings and sharp, angular shapes.
- Use white paint to add detail, such as eyes, wings, and fur. Consider varying the size and style of the bats to create a dynamic and visually appealing composition.
4. Mummy Pumpkin Painting
Mummy pumpkin painting is a charming way to bring a touch of the ancient Egyptian mystery to your Halloween decor. Don’t be afraid to make your mummies quirky or comical with goofy facial expressions. Wrapping your pumpkin in gauze-like patterns is where the fun begins.
Materials: Mini pumpkin, white and black acrylic paints, fine-tipped paintbrush
Instructions:
- Begin with a clean mini pumpkin. No need for a base coat, as the mummy will be painted white.
- Use white paint to cover the pumpkin entirely, creating a clean, white canvas.
- Once the white paint has dried, use black paint to create mummy-like bandages. These can be horizontal and vertical lines, crisscrossing the pumpkin to create the wrapped effect.
- Add two large, circular eyes with black paint, creating the impression that the mummy is peering out from beneath the bandages. You can make the eyes playful or spooky, depending on your preference.
- Optional: Add a little mouth or other details for personality.
5. Frankenstein Pumpkin Painting
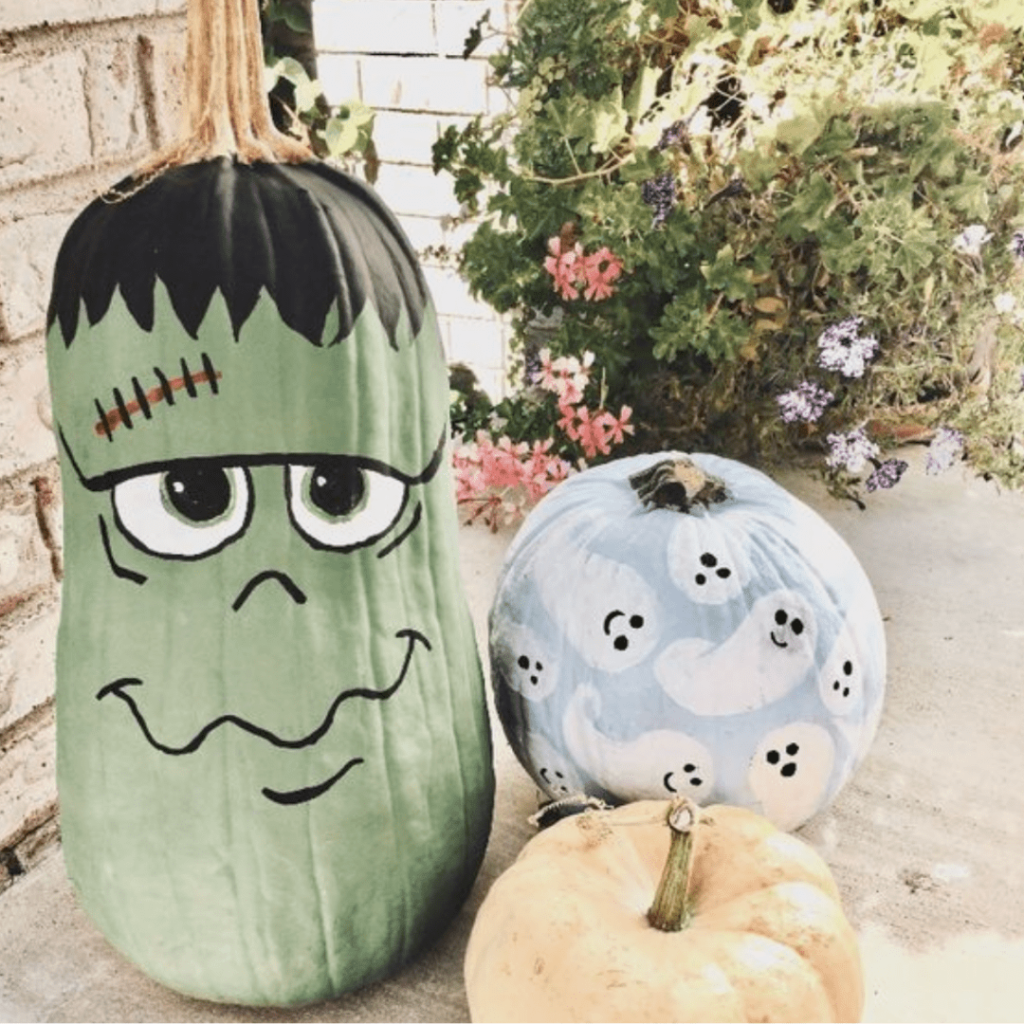
Give your Frankenstein pumpkin character by experimenting with expressions, scars, and hair. Play with various shades of green to create depth, and don’t forget to add some bolts to the sides of the head. Remember, the imperfections in your design can give your creation a unique charm.
Materials: Mini pumpkin, green, black, and white acrylic paints, fine-tipped paintbrush
Instructions:
- Start with a clean mini pumpkin. A green base coat will create the classic Frankenstein look.
- Paint the entire pumpkin green and let it dry.
- Use black paint to add two bolts on the sides of the pumpkin. These can be flat-topped rectangles with a line in the center.
- Create a scar on the pumpkin’s forehead by painting a jagged, lightning bolt-shaped line with black paint.
- Paint on Frankenstein’s eyes, nose, and mouth. Experiment with different expressions, but the square-shaped head and bolts are essential for the iconic look.
6. Harry Potter Pumpkin Painting
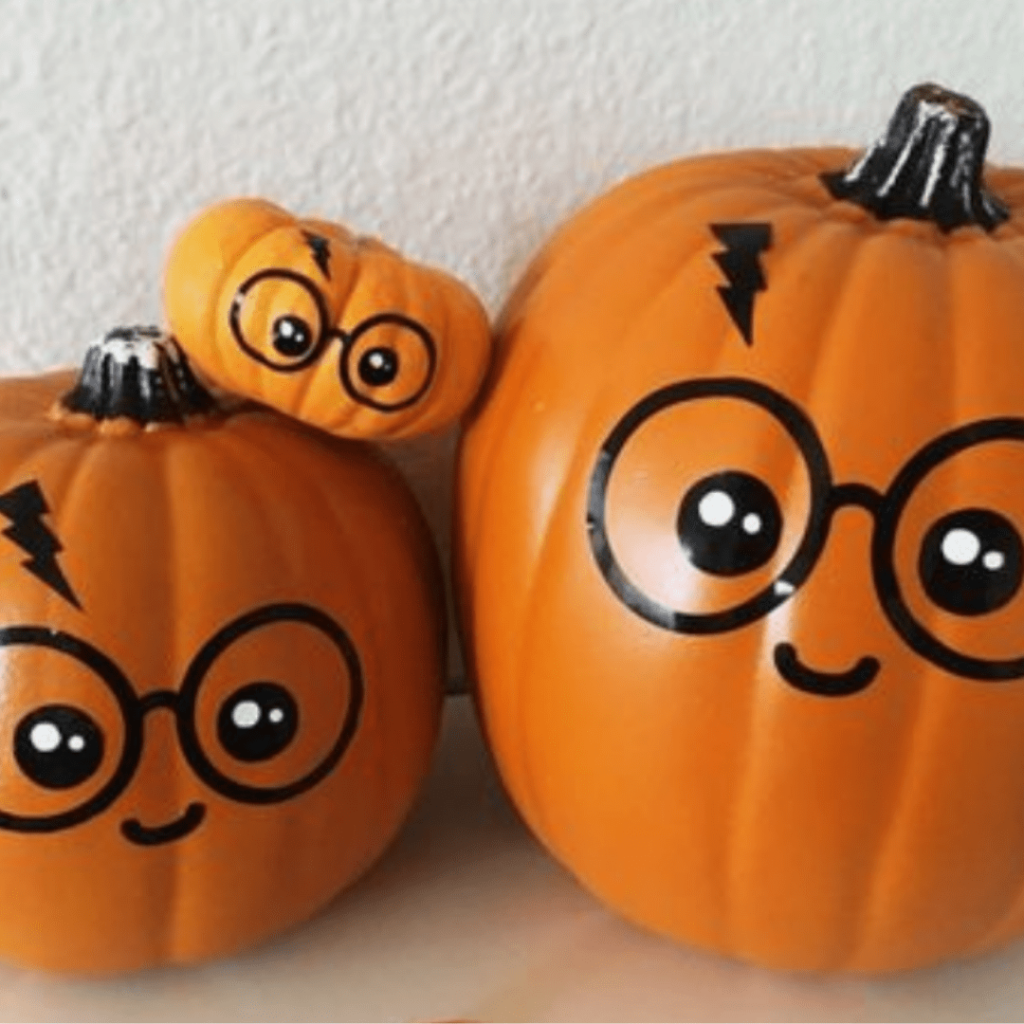
For Harry Potter fans, there are endless possibilities. Delve into the details of the Hogwarts house crests, experimenting with the choice of background colors. To add an extra layer of authenticity, try painting wands, broomsticks, or the Marauder’s Map.
Materials: Mini pumpkin, acrylic paints in your chosen Hogwarts house colors, black and white acrylic paints, fine-tipped paintbrush
Instructions:
- Start with a clean mini pumpkin and choose the colors of your favorite Hogwarts house: Gryffindor (red and gold), Slytherin (green and silver), Hufflepuff (yellow and black), or Ravenclaw (blue and bronze).
- Paint the pumpkin with the base color of your chosen house.
- Use black paint to draw Harry Potter’s signature lightning bolt scar on the forehead of your pumpkin.
- Add glasses using black paint. These should be circular with a bridge connecting them in the middle. Optionally, you can add other details like a wand, the Marauder’s Map, or your favorite house’s emblem.
7. Unicorn Pumpkin Painting
Unicorn pumpkin painting offers a delightful mix of enchantment and whimsy. Experiment with pastel shades and consider adding shimmery touches or glitter for a magical effect. Play with different unicorn expressions, and don’t forget the flowing, colorful mane.
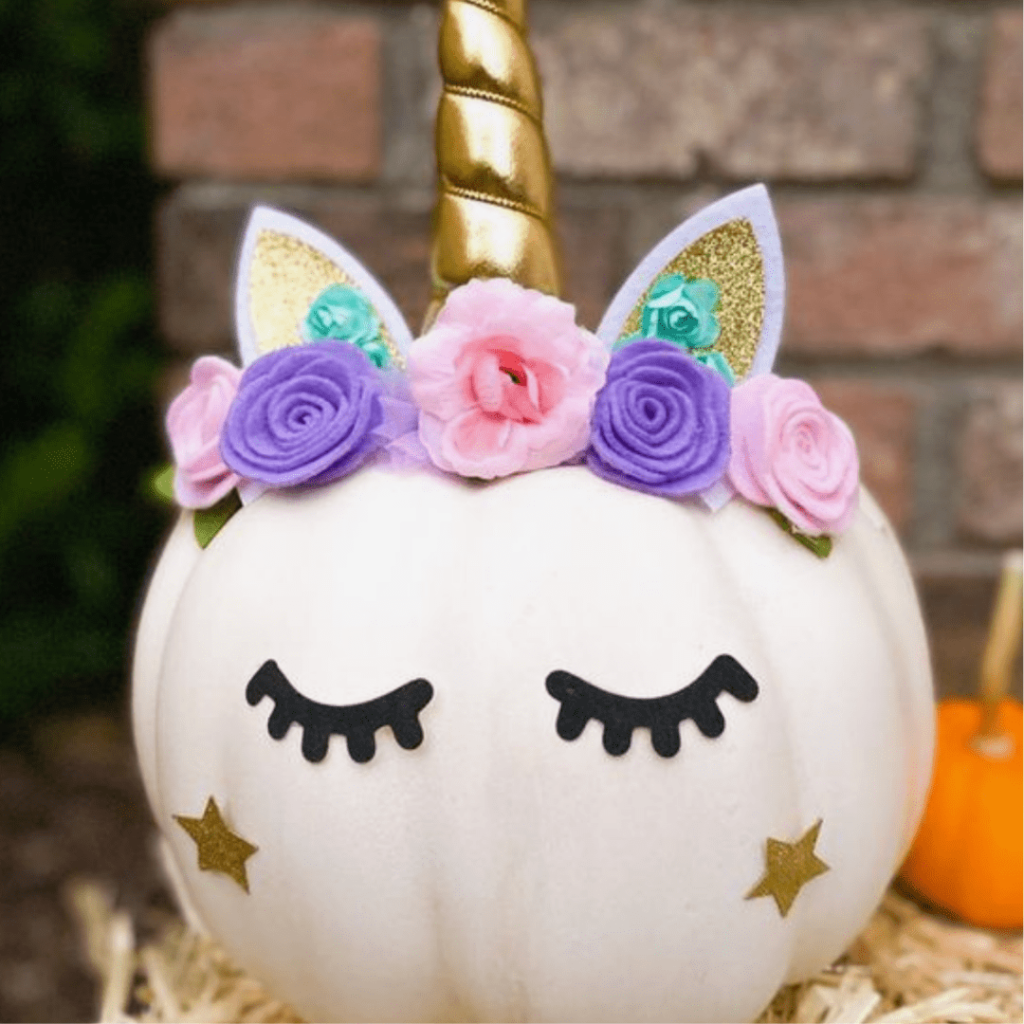
Materials: Mini pumpkin, pastel acrylic paints, fine-tipped paintbrush, paper roll, glitter (optional)
Instructions:
- Begin with a clean mini pumpkin. Pastel colors will give your unicorn a magical look.
- Paint the entire pumpkin with a pastel color of your choice. You can use a soft pink, lavender, or baby blue, for example.
- Create a unicorn horn by rolling the paper roll in a spiral shape and glue it on top of the pumpkin. After paint it in a complementary pastel color.
- Paint large, expressive eyes. Make them round and colorful, adding eyelashes if you like.
- Add a flowing, colorful mane using a variety of pastel colors. The mane can flow down the sides of the pumpkin for an enchanting effect.
- Optional: You can make your unicorn even more magical by adding glitter to the horn or the mane.
8. Stitch Pumpkin Painting
Stitch, the lovable alien, offers a unique and adorable pumpkin painting idea. This design is particularly enjoyable for kids. Focus on capturing Stitch’s round eyes, large ears, and distinctive blue skin. The rough-around-the-edges appearance adds charm to your creation.
Materials: Mini pumpkin, blue acrylic paint, black and white acrylic paints, fine-tipped paintbrush
Instructions:
- Start with a clean mini pumpkin.
- Paint the entire pumpkin with blue acrylic paint, creating a bright blue canvas.
- Use white paint to create the large, expressive round eyes, making them a bit crossed to capture Stitch’s unique look.
- Add large ears on either side of the pumpkin with blue and black detailing. Don’t forget the inner ear color.
- Paint a wide, mischievous grin with sharp, uneven teeth.
- Use black paint to add Stitch’s signature dark nose.
9. Day of the Dead Pumpkin Painting
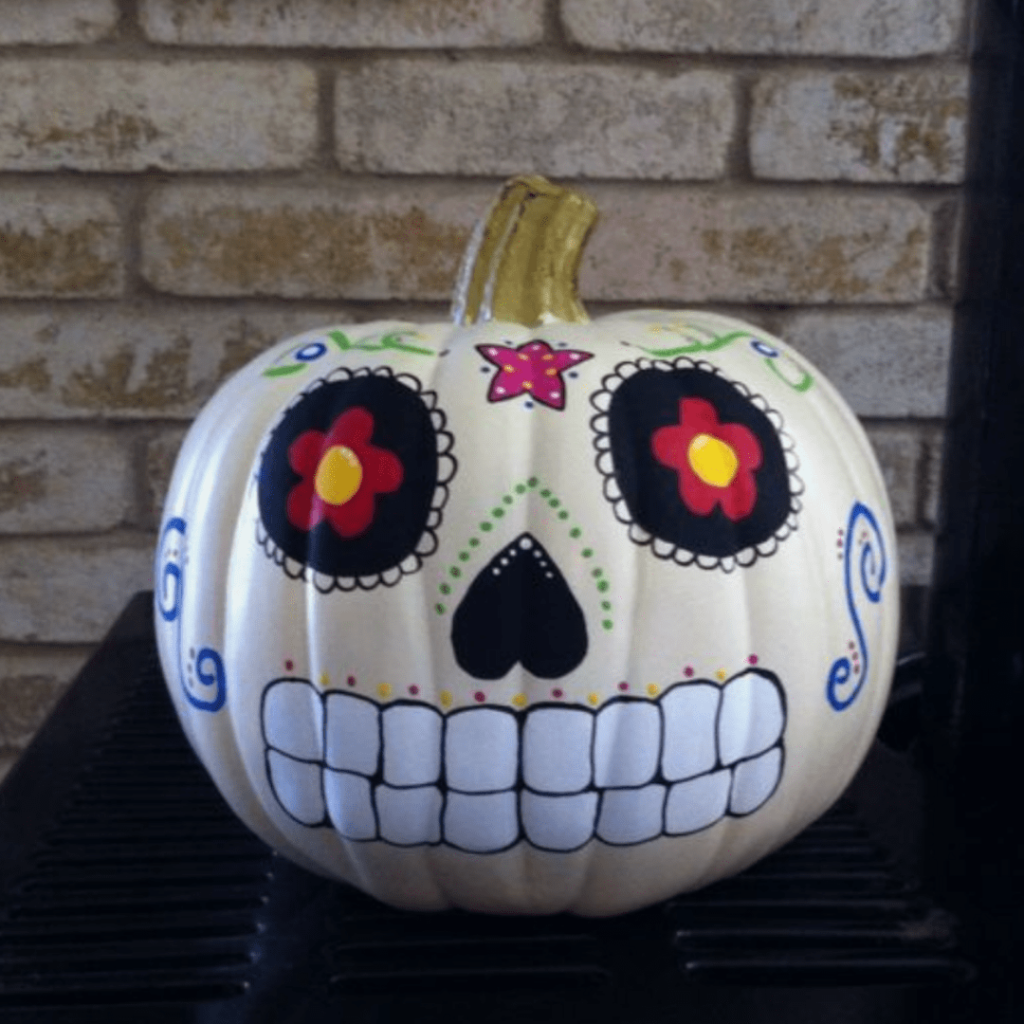
Day of the Dead-inspired pumpkin painting provides a wonderful opportunity to explore vibrant colors and intricate patterns. Sugar skulls are the heart of this theme. Use bright reds, oranges, blues, and greens for a vibrant look. Floral and geometric designs will add depth and authenticity.
Materials: Mini pumpkin, white and bright, colorful acrylic paints, fine-tipped paintbrush
Instructions:
- Begin with a clean mini pumpkin. A white base coat will allow the vibrant colors to pop.
- Paint the entire pumpkin white and let it dry.
- Use bright and bold colors to create intricate sugar skull patterns on the pumpkin. This can include flowers, hearts, swirls, dots, and other decorative elements.
- Add colorful designs around the eyes, nose, and mouth area.
- Don’t forget to paint a vibrant and colorful background to make the designs stand out.
- Add details like a red or yellow nose, and intricate, colorful patterns around the eyes.\
10. Jack-O’-Lantern Pumpkin Painting
Don’t forget the timeless Jack-O’-Lantern! Experiment with various expressions, from spooky to friendly, and try out different carvings to create unique effects when lit. You can also use glow-in-the-dark paint to enhance the eerie glow at night.
Materials: Mini pumpkin, orange and black acrylic paints, fine-tipped paintbrush
Instructions:
- Start with a clean mini pumpkin. The traditional Jack-O’-Lantern is orange.
- Paint the entire pumpkin orange and let it dry.
- Use black paint to create a classic Jack-O’-Lantern face. Begin with the eyes, which are usually large and triangular.
- Add a nose, which can be a simple triangle or other shapes depending on your preference.
- Finish with the mouth, which often features a wicked grin with sharp, toothy lines. You can experiment with different expressions.
- For the finishing touch, you can carve a small hole at the top of the pumpkin and insert a tea light or LED candle to make it glow in the dark.
11. Ghost Pumpkin Painting
Ghost-themed pumpkin painting offers a range of design choices. Depending on the style you choose, you can create a whimsical or spooky look. Experiment with translucent white layers for a ghostly effect, and add playful or sinister expressions.
Materials: Mini pumpkin, white and black acrylic paints, fine-tipped paintbrush
Instructions:
- Begin with a clean mini pumpkin.
- Paint the pumpkin white to create a ghostly canvas.
- Once the white paint is dry, use black paint to create the ghostly features. For a spooky look, you can create large, hollow black eyes and an open, wailing mouth.
- Alternatively, for a cute ghost, you can paint round, friendly eyes and a playful, closed-mouth smile.
- Experiment with different expressions and styles, and feel free to get creative with the ghost’s personality.
12. Witch Pumpkin Painting
Witches are a quintessential part of Halloween, and witch-themed pumpkin designs can vary from whimsical to spooky. Consider the witch’s hat as a focal point, and experiment with shades of black, purple, and green. Add warts, crooked noses, and mischievous grins for that classic witchy touch.
Materials: Mini pumpkin, black, green, and purple acrylic paints, fine-tipped paintbrush
Instructions:
- Start with a clean mini pumpkin. A black hat and robes will create the classic witch look.
- Paint the pumpkin’s body black and let it dry.
- Use green paint to create a wart on the nose and add other green accents to create a witch-like complexion.
- Create a pointy hat by rolling the paper in a spiral shape and glue it on top of the pumpkin.
- Paint the top black with a brim and create a circle around the spiral and paint that black as well to create a black hat (add a purple sash or band for detail).
- Experiment with different facial expressions for your witch, ranging from a wicked grin to a sly smirk.
- You can also add a broomstick, a cauldron, or a cat to complete the theme.
13. Cat Pumpkin Painting
Cat-themed pumpkins can range from cute and playful to sleek and mysterious. Focus on the cat’s eyes, ears, whiskers, and tail, and experiment with different coat colors. Don’t forget to add a collar with a tiny bell for a finishing touch.
Materials: Mini pumpkin, black acrylic paint, fine-tipped paintbrush
Instructions:
- Begin with a clean mini pumpkin. Black is the ideal color for a classic cat.
- Paint the pumpkin entirely black and allow it to dry.
- Create pointed cat ears on top of the pumpkin. You can paint them black or add other colors for detail.
- Paint bright, expressive eyes with black paint, adding white highlights to give them depth.
- Add whiskers and a small, button-like nose.
- Paint a playful or mischievous smile to complete the cat’s face.
- Optional: You can add a collar with a tiny bell for a charming finishing touch.
With these 13 mini pumpkin painting ideas, you have a myriad of options to explore and enjoy. Mini pumpkin painting is not just a creative Halloween activity; it’s an opportunity to bond with friends and family while adding a personal touch to your decor. Remember to embrace the process and let your imagination run wild. Whether you’re creating spooky, cute, or enchanting designs, mini pumpkin painting is a wonderful way to celebrate the spirit of Halloween. Happy painting, and happy Halloween!